
I like to paint walls. It's a
predilection I picked up in childhood from watching my mother. She
was the original DIY girl when it came to welding paint brush and transforming the environment. The walls in our house were
forever changing color. It was something you couldn't help but
notice, the way a gallon of liquid could magically change the nature of things. I passed my childhood in a pretty shade of periwinkle, looking out from under my canopy bed on wall paper sprinkled with yellow centered daisies. Adolescence came as a surprise, along with my mother's wall to wall shag rug in fashionable avocado. I traded in my canopy bed for a cool pull-out sleeper sofa. My walls turned a noxious yellow, but hey, we were styling with the times.
 I took up my mother's tools with
enthusiasm and aplomb when I left home. The first walls I ever painted
solo, I convinced the landlord I knew exactly what I was doing. I spred out an old bed sheet with careful expertise, popped the paint can open and rolled the walls with a new coat of rental unit Navajo white. Dull and unattractive as colors go, but it freshened things up. No charge. Mutual benefit.
I took up my mother's tools with
enthusiasm and aplomb when I left home. The first walls I ever painted
solo, I convinced the landlord I knew exactly what I was doing. I spred out an old bed sheet with careful expertise, popped the paint can open and rolled the walls with a new coat of rental unit Navajo white. Dull and unattractive as colors go, but it freshened things up. No charge. Mutual benefit.
By the time I got married, my painting skills advanced to trickier things like crown molding and baseboards. My husband
and I bought and sold homes in between having babies. Years passed with ample opportunity to practice. I approached the wall as an art form and worked through various aesthetics...stencils, wall paper borders, sponges and faux finishes. We
moved so often on the way to Northern California it took a while for me to notice that resale value went hand in hand
with my color choices; that I was forever considering walls from a potential
buyer's viewpoint instead of my own. Until, at last, we got to the end of the rainbow and I realized with certainty we weren't going to be moving anymore. Then an interesting thing
happened: I finally felt free to really do what I liked.

 Now it could be that this was somewhat of a
maturation process on my part, having reached close to my own half century mark, but it occurred, coincidentally, about
the same time I discovered mosaics. Color seduced me with a
punch to the heart...no more tip toeing around in neutrals or pastels. No more painting with someone else's possible preferences in mind. Like a woman on fire, I came home with
reams of cheese cloth and spent months swirling golds and corals and turquoise on the walls of our house.
Now it could be that this was somewhat of a
maturation process on my part, having reached close to my own half century mark, but it occurred, coincidentally, about
the same time I discovered mosaics. Color seduced me with a
punch to the heart...no more tip toeing around in neutrals or pastels. No more painting with someone else's possible preferences in mind. Like a woman on fire, I came home with
reams of cheese cloth and spent months swirling golds and corals and turquoise on the walls of our house.  |
Down at the studio, I dreamed of San Miguel de Allende in neon and painted pure south of the border.
And when all that painting was done, I recognized there was no end to embellishment and started mosaicing the walls.


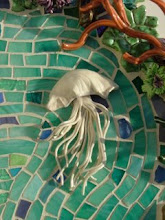
 Next to the door, going into the old house, is a portion of wall we had left covered in hardibacker for a furture mural. Keeping with the ocean theme of the existing mural in the studio, Jan projected this mermaid on the wall and colored her in with chalk. Then began the delicious collection of baubles and beads. Collecting a veritable "Pirates of the Carribean" treasure chest of goodies to mosaic with is Jan's forte. Problem arose when we discussed how to mosiac our mermaid's body parts. Wouldn't it be nice to make them in 2-D clay? Yes of course, but while Jan and I like to sculpt neither one of us has any experience sculpting the human body.
  Enter our 26 year old friend, Nora Schwaller, who is finishing her BFA in Ceramics at San Jose State. Nora, aka "Bird Girl" (self explanatory when you view her body of artwork) can sculpt the human body, no problemo! See below. Nora's not bad when it comes to birds either:)


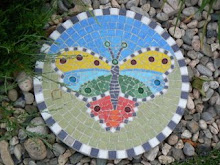
 And look like this...
 Impressive work in one afternoon, yes, yes, yes! It pays to have talented friends in the sculpting department.


